CSS in R Markdown
This Spotlight introduces HTML and CSS, then shows how to use CSS to customise the HTML output of an R Markdown document.
Basics of web development
HTML, CSS and JavaScript have complementary roles in web development.
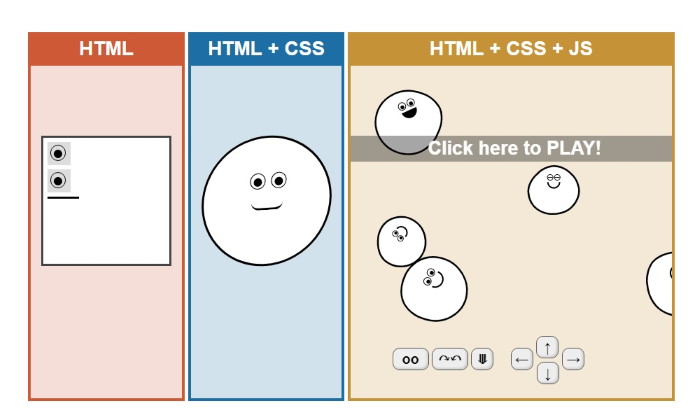
HTML defines a page's elements and how they are arranged. It answers the question "What is it?"
CSS stands for Cascading Style Sheets and answers the question "What does it look like?"
JavaScript adds scripted behaviour, answering the question "What should it do?"
JavaScript can change a page's content, structure and appearance in response to events. Some interactions can be handled by CSS alone: for example, :hover can change an element's colour when a pointer rests over it. Use JavaScript when the desired behaviour requires scripting.
You can try the differences and play with the heads from the picture above on [html-css-js.com](https://html-css-js.com/).
The rest of this Spotlight focuses on HTML and CSS.
What is HTML?
HTML (Hypertext Markup Language) is the code that is used to structure a web page and its content. For example, content could be structured within a set of paragraphs, a list of bulleted points, or using images and data tables.
It is the language used to create webpages. “Hypertext” refers to the hyperlinks that an HTML page may contain. “Markup language” refers to the way tags are used to define the page layout and elements within the page.
Below is an example of HTML used to define a basic webpage with a title and a single paragraph of text.
<!doctype html>
<html lang="en">
  <head>
    <title>Description of the page (appears in the title bar of the browser)</title>
  </head>
  <body>
    <p>This text is displayed in the browser window.</p>
  </body>
</html>
And the result in the page body:
HTML tags use angle brackets to mark elements and tell the browser how to interpret their content. Container elements such as <html> and <p> have opening and closing tags. A closing tag has a slash before the element name, as in </html> at the end of the example. Void elements, such as <img>, <br> and <input>, cannot contain content and do not have closing tags.
The first line defines what type of contents the document contains. <!doctype html> means the page is written in HTML5. Properly formatted HTML pages should include
<html>, <head>, and <body>, tags, which are all included in the example above. The page title, metadata, and links to referenced files are placed between the <head> tags. The actual contents of the page go between the <body> tags.
The web has gone through many changes over the past few decades, but HTML has always been the fundamental language used to develop webpages. Interestingly, while websites have become more advanced and interactive, HTML has actually gotten simpler. If you compare the source of an HTML5 page with a similar page written in HTML 4.01 or XHTML 1.0, the HTML5 page would probably contain less code. This is because modern HTML relies on Cascading Style Sheets or JavaScript to format nearly all the elements within a page.
So basically HTML is the text content on webpages.
More information and self-study elements on
What is CSS?
CSS stands for Cascading Style Sheets with an emphasis placed on Style. While HTML is used to structure a web document (defining things like headings and paragraphs, and allowing you to embed images, video and other media), CSS specifies the document’s style. Page layouts, colours and fonts are all determined with CSS.
CSS is basically the appearance of a webpage.
When something should change in the appearance of a page, the browser needs to know:
- Which HTML element do we want to select (choose) in order to change its appearance?
- Which property do we want to change, such as its position, colour, background colour or text size?
- What should it look like (which value do we assign to the property)?
Examples are:
Text colour: red;
background colour: beige;
text size: twice the normal size;
Position: 2 cm further to the left;
etc.
Such settings are called the style of an element. But not everything looks the same on a site. For example, headings are larger and bolder than normal text. This is because your browser already comes with extensive style rules for each element.
A style property is set, in general terms, with this notation:
name: value;
To make an element’s text red, use the color property. Colours can be specified in several ways. One simple option is a colour name:
color: red;
For an internal stylesheet, put CSS rules in a <style> element inside the page’s <head>. A style rule looks like this:
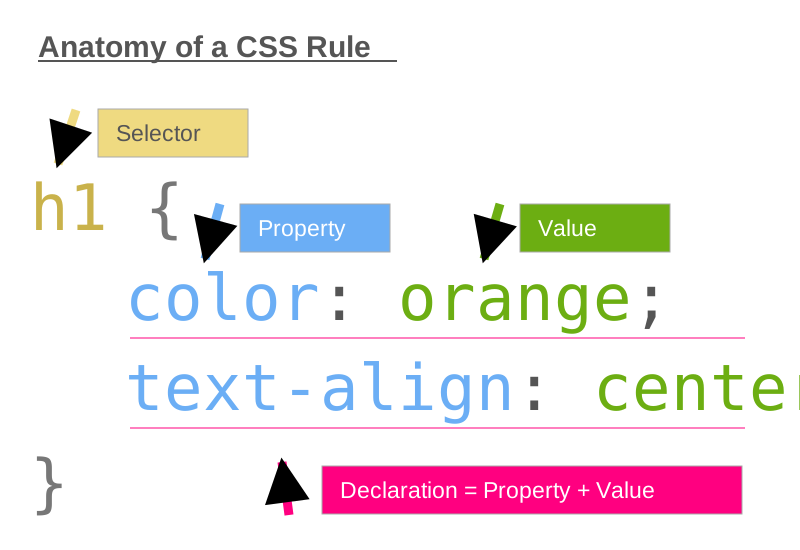
A CSS rule begins with a selector that specifies which HTML elements the rule should apply to. The illustration above uses h1 to select first-level headings. The code example below instead uses h2 to select second-level headings. The selector is followed by a left curly bracket ({), then the CSS properties to set for the selected elements. Each property is terminated by a semicolon. Finally, the rule ends with a right curly bracket (}).
In the <head> area of your page, it may look like this:
<style>
h2 {
  color: red;
  background-color: beige;
  font-size: 1.5em;
}
p {
  color: brown;
}
</style>
Note that the semicolon after each property is an important part of CSS syntax. Line breaks are irrelevant for CSS rules.
Besides the text colour, the first rule sets the background-color and font-size properties. Use a decimal point in CSS numeric values, for example 1.5em. The second rule sets the text colour of all <p> elements to brown.
You can write as many CSS rules as you like in the <style> element. A separator between two rules is not required.
It is possible to store the formatting in a style element in the head of the page. But it makes more sense to collect them in one CSS file for all HTML documents. Therefore, write the CSS rules in a new file and save the file as format.css in the same directory as the index file. It is necessary to tell the browser that it should consider the file format.css when it displays the index.html. It is possible to think it is obvious that the two files somehow belong together, but the browser does not.
For this the start page, the index.html file, has to be adjusted with <link rel="stylesheet" href="format.css">
The new line just tells the browser to apply the CSS instructions from the file format.css to the HTML file. This line needs to be included in the other HTML files as well and in any subsequent ones that might be added later. This stylesheet now sets the appearance centrally for all web pages.
Note that for the subpages, which are after all in a directory other than index.html, adjust the stylesheet path. For a page one directory below the stylesheet, use: <link rel="stylesheet" href="../format.css">
<!doctype html>
<html lang="en">
  <head>
    <title>Description of the page (appears in the title bar of the browser)</title>
    <link rel="stylesheet" href="format.css">
  </head>
  <body>
    <p>This text is displayed in the browser window.</p>
  </body>
</html>
You don’t have to reinvent the wheel to make a nice page. There are plenty of free code snippets on the web and even ready-made CSS styles for free or to buy. Free CSS style templates available at
This Edureka video on “what is CSS” explains what CSS is along with all the varied elements and fundamentals of CSS.
HTML and CSS in a nutshell
Finally, compare HTML and CSS:

In text: HTML identifies the structure and content of a page, such as headings, paragraphs and links. CSS sets their appearance, including fonts, colours, spacing and layout.
Further information about CSS:
CSS in R Markdown
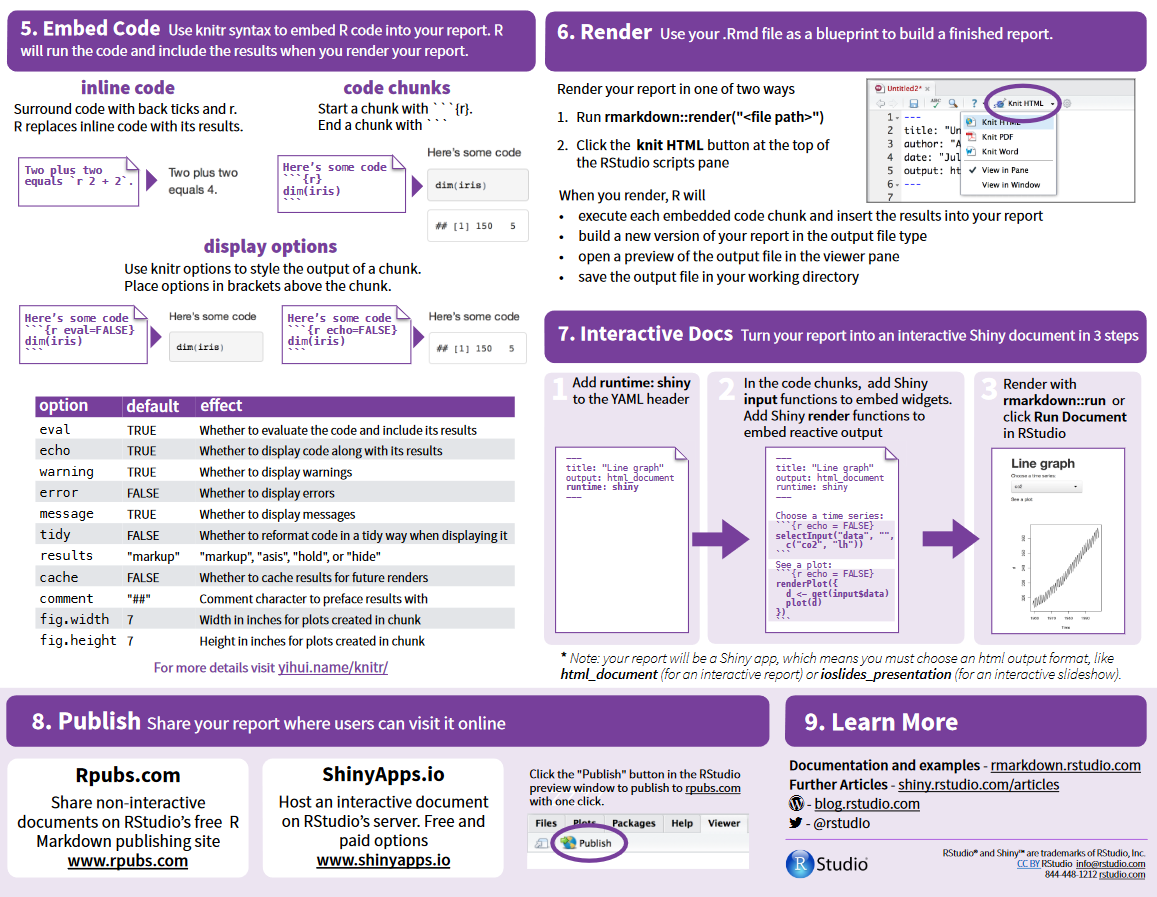
This optional section assumes that you already know how to create an R Markdown (.Rmd) document and render it to HTML. The core units can be completed with R scripts; learning R Markdown is an additional step. If it is new to you, start with the R Markdown cheat sheet linked below before applying these CSS settings.
Learn at least the basics of CSS if you wish to customise the appearance of HTML documents. JavaScript is useful for adding scripted behaviour, but is not required for the styling examples below. For beginners, it is extremely important to understand selectors and precedence of rules in CSS, otherwise you may be confused why your custom CSS rules do not work as expected (they may not have enough precedence).
To include a custom stylesheet in an R Markdown (.Rmd) document, use the css option in the YAML header, for example:
output:
  html_document:
    css: "style.css"
To include multiple stylesheets, you may list them in brackets, e.g.,
output:
  html_document:
    css: ["style-1.css", "style-2.css"]
Alternatively, use a CSS code chunk to embed style rules directly in your R Markdown document. Copy the complete chunk, including the opening and closing backticks:
```{css, echo=FALSE}
p {
  font-size: 32px;
}
```
The chunk option echo = FALSE means the CSS code will not be displayed verbatim in the output, but a <style> tag containing the CSS code will be generated to the HTML output file.
Example with a list:
* Item 1
* Item 2

and

1. Item 1
1. Item 2
  - Sub a
  - Sub b
The above Markdown renders to the following HTML:
<ul>
    <li>Item 1</li>
    <li>Item 2</li>
</ul>
<p>and</p>
<ol>
    <li>Item 1</li>
    <li>Item 2
        <ul>
            <li>Sub a</li>
            <li>Sub b</li>
        </ul>
    </li>
</ol>
The Markdown ultimately renders to the following output:
- Item 1
- Item 2
and
- Item 1
- Item 2
- Sub a
- Sub b
What if you want to give one Markdown list a specific colour? The plain list syntax in this example does not assign a class to the generated <ol> element. Some Markdown variants support attributes, and raw HTML is another option. Here, we place an HTML marker directly before the list and use the adjacent sibling selector (+) to style the ordered list that immediately follows it.
<style>
    .bold-list + ol {
        font-weight: 900;
        color: #257f96;
    }
</style>
<div class="bold-list"></div>
1. Item 1
1. Item 2
  - Sub a
  - Sub b

but this is not styled:

1. Another item 1
1. Another item 2
With this neat CSS trick we get this output:
- Item 1
- Item 2
- Sub a
- Sub b
but this is not styled:
- Another item 1
- Another item 2
For more information about R Markdown syntax in general have a look at the R Markdown cheat sheet: Download R Markdown Cheat Sheet