
Programming - setting up the pi
Raspberry Pi Camera Monitoring
In ecology, it is often usefull or even necessary to get image data of the species of interest. Timelapse data, i.e., a a collection of sequential observations recorded over a period of time at specific intervals, can be especially useful. Instead of manually taking pictures every day, we can automate this process using a Raspberry Pi with a camera module, turning it into a small, programmable time-lapse station.
The Raspberry Pi Foundation has developed a series of cameras, which can be mounted to the Raspberry Pi computer. We can then program the computer to take pictures at specified times. If the Raspberry Pi is connected to the internet, we can even transfer the images to a remote folder, thus making the data instantly accessable.
This practice shall lead you through the steps necessary to set up the raspberry pi zero as a time-lapse camera. Due to the headless set up, meaning that you cannot directly connect to the pi zero with keyboard and mouse, we have to do some steps first. The SD cards you were given should have been steps x to x already done. Skip to step X
🧰 What You’ll Need
- Raspberry Pi Zero W
- Raspberry Pi Camera Module
- MicroSD card (≥8 GB)
- SD card reader
- Micro USB power cable
- Laptop (Windows)
- Access to a Wi-Fi network or hotspot
Step 0: Install Visual Studio Code (optional)
To connect to the Raspberry Pi Zero and operate in its shell via SSH on a Windows computer, there are several options depending on your preferences. One option is to use PuTTY, a free SSH client for Windows that gives you access to the Pi’s command line in a simple interface. Another option is to use the built-in Terminal or PowerShell — just search for “Terminal” or “PowerShell” in the Windows Start menu and use it to connect via SSH.
In this course, we’ll use Visual Studio Code, which is also a free code editor that works on Windows, macOS, and Linux. It features syntax highlighting, autocomplete, Git integration, debugging and explorer — all which are very useful for other tasks used in environmental informatics. See a little walk-through of the basic functions here.
The explorer (left side bar) shows your project folder and files, the editor window (main central area) is where you can write code and script not directly executed. In the terminal (you might need to open a new one) is where the commands are executed.If you later choose to use version control (for example, saving your work with Git or GitHub), this section allows you to track changes, commit edits, and sync with online repositories.
To connect to the Raspberry Pi through VS Code, you’ll need to install the Remote - SSH extension. You can open the Extensions panel by pressing Ctrl + Shift + X, then search for “Remote - SSH” and click Install.
Step 1: Flashing the OS
As explained in unit03-01, when using the Raspberry Pi for the very first time, the first step is to install an operating system onto a sufficient boot (micro sd-card). The Raspberry Pi doesn’t come with a built-in OS. It must boot from a microSD card that contains an operating system. We’ll use Raspberry Pi OS Lite, a minimal command-line version suitable for our headless setup. This is done using the Raspberry Pi Imager software. The Raspberry Pi Foundation provides a detailed tutorial for this step.
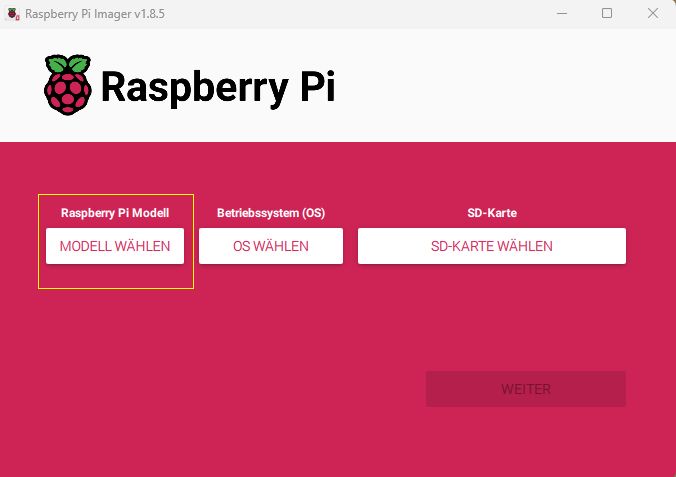
1.1: Download the Raspberry Pi Imager
Once installed, launch the Raspberry Pi Imager.
1.2: Set up the OS
To set up the Raspberry Pi Zero in headless mode, it needs a data connection. You can connect it to a wireless network, such as your home Wi-Fi or a mobile hotspot. In the Raspberry Pi Imager, enter the network name (SSID) — make sure to include spaces exactly as they appear — and the Wi-Fi password. The device you’ll use to control the Pi (e.g., your laptop or PC) must also be connected to the same network so it can find and communicate with the Pi.
What does “headless” mean?
A headless setup means the Raspberry Pi runs without a monitor, keyboard, or mouse.
SSH is what allows us to use it anyway.
What is SSH?
SSH (Secure Shell) is a protocol that allows you to remotely access the Raspberry Pi’s terminal — the command-line interface — over a network. It’s like opening a virtual window into the Pi from your laptop, so you can:
- Run commands
- Install software
- View or transfer files
- Choose Device: Select
Raspberry Pi Zero

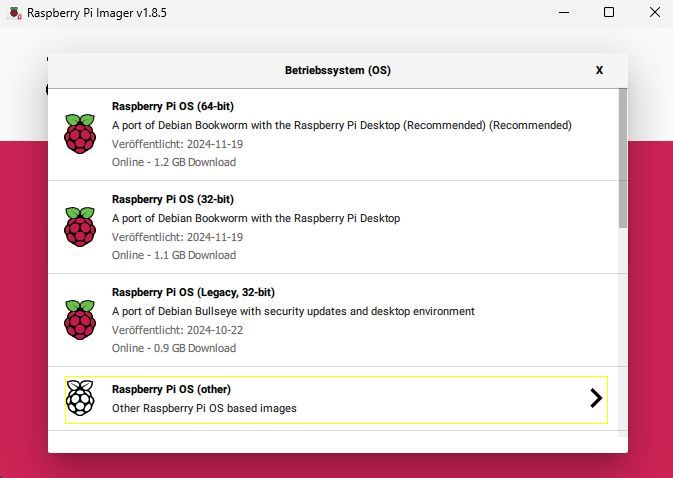
- Choose OS: Select
Raspberry Pi OS Lite (32-bit)

- Click the gear icon (⚙️) to open Advanced Settings:
- Hostname: e.g.,
PS-01 - Username & Password: As provided on ILIAS
- Wi-Fi SSID: Enter your network name exactly
- Wi-Fi Password: Enter your Wi-Fi password
- Hostname: e.g.,

- Leave Enable SSH unchecked (we’ll enable manually, see step 1.3)
- Click Next, select your SD card, and click Write
-
Confirm the warning to overwrite the card
Raspberry Pi Imager will now:
- Erase the card
- Write the new OS (Raspberry Pi OS Lite)
- Create two partitions:
- A small “boot” partition (FAT32 — visible in Windows)
- A large Linux partition (ext4 — not visible in Windows), which holds the main operating system and user files.
This process can take several minutes.
If your cards was ejected, inject it again.
1.3: Enable SSH Access manually
Two Ways to Use SSH
SSH supports two types of authentication:
Option A: Username + Password
This is what we’ll use in this course. It’s simple, though slightly less secure.
Option B: SSH Keys (more secure — not used here)
SSH keys work like a lock and key system:
- Private key (your computer): Like your personal key
- Public key (Raspberry Pi): Like a padlock
When you try to connect, the Pi checks whether your key matches. If yes, it lets you in — no password needed.
We’re not using keys here to keep things simpler. Instead, we’ll use a password login, which is fine for local student work.
Because SSH wasn’t enabled in Imager, we’ll now do it manually:
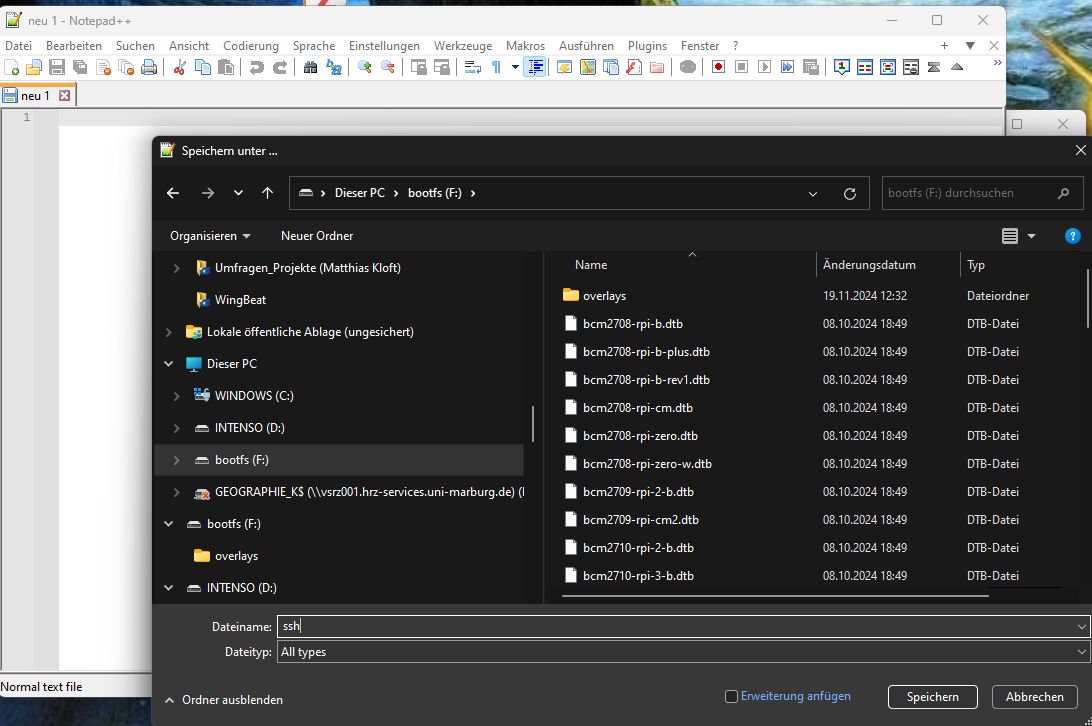
- Open the
bootpartition of the SD card in File Explorer (you’ll see it as a new drive) -
Create an empty file called
ssh(no extension!)You can use Notepad++ or similar:
- File → New
- Save As → Filename:
ssh - Save as type: All files (
*.*) - Make sure it’s not
ssh.txt
- Safely eject the SD card.
✅ Your Pi is now ready for headless boot with SSH access.
Step 2: Boot the Raspberry Pi and Connect
Once you’ve finished preparing the SD card, insert it into the microSD slot of the Raspberry Pi Zero. Then connect the Pi to a power source using a micro USB cable. The device will automatically begin its first boot process, which may take up to a minute. As it starts, you should see a small onboard LED begin to blink — this is a good sign that the Pi is running properly.
Since we are using a headless setup — meaning the Pi has no screen, keyboard, or mouse — you’ll need to connect to it remotely using SSH from your laptop. For this to work, both your laptop and the Raspberry Pi must be connected to the same Wi-Fi network. This is the network you entered during the setup in Raspberry Pi Imager (Step 1.2.6).
If you’re using a mobile hotspot (such as from your phone), you can often view connected devices in your hotspot settings. The Raspberry Pi should appear with the hostname you set earlier (Step 1.4), such as ps-01. If you’re connected through a router, you can usually find the Pi’s IP address by logging in to your router’s web interface. This is typically accessible by typing 192.168.0.1 or 192.168.1.1 into a web browser and checking the list of connected devices.
Once you’ve found either the hostname or the IP address, open Visual Studio Code, launch a terminal window inside it, and connect to the Pi by typing the following command:
ssh [add username defined in 1.5]@[IP.Adress]
Replace your-username with the name you configured during setup, and ip-address with the actual IP address or hostname of the Pi.
You should now be asked for the passwiord you defined in 1.5. Type it in (note: you won’t see it)- if everything worked, worked, the name in the console will switch to your chosen username@Hostname:
Potential issues: Sometimes, when you’ve previously connected to a Raspberry Pi and then re-flash the SD card (or use a different Pi with the same IP address), your computer might refuse to connect via SSH. This is a security feature built into SSH: your computer remembers the identity of devices it has connected to before — specifically their host keys. SSH will detect the mismatch and block the connection, displaying a warning like this:
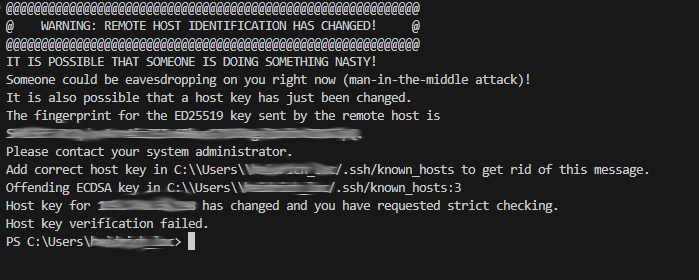
To fix this, you need to remove the outdated key from your computer’s list of known hosts — a file where SSH stores identities of previous connections.
On Windows: Open File Explorer
Navigate to: C:\Users<YourUsername>.ssh\known_hosts
Open the file in Notepad++ or another plain text editor
Look for the line containing the Pi’s IP address or hostname (e.g., 192.168.0.42)
Delete that line
Save the file
Step 3: Install Camera Software and Enable Network Manager
Before we can take photos or control the Raspberry Pi’s camera, we need to install the required software. At the same time, we’ll make sure the system is up to date. These commands should be run on the Raspberry Pi after it is connected to the internet, either through a shared connection or existing Wi-Fi setup.
System Update vs Upgrade — What’s the Difference?
sudo apt (advanced package tool) is used to install, update, upgrade and remove packages.
Before installing new software, it’s good practice to update and upgrade the system. If you’re using a freshly flashed image (like Raspberry Pi OS Lite downloaded via Raspberry Pi Imager just recently), then your system is likely already up to date.
-
sudo apt update:
Downloads the latest list of available packages and versions from the internet — like refreshing a catalog. -
sudo apt upgrade:
Installs the latest versions of all software currently installed on the system.
It does not install new packages, but may download dozens of small-to-medium updates.
You may choose to skip apt upgrade unless:
- You encounter problems during package installation
- You plan to use the Pi long-term and want current security patches
However, running apt update is still recommended, as some software packages may need to fetch the most recent dependency lists, even on a new image.
Running sudo apt upgrade can consume 100–300 MB of data, depending on how many updates are available. If you’re connected via a mobile hotspot or metered connection, consider skipping this step or doing it later on a full network connection.
sudo apt update
sudo apt upgrade # attention, uses quite some data, see above
Next, we install the basic tools you might want to use to control the Raspberry Pi camera, including Python support for scripting.
NOTE: rpicam-apps is outdated in the new OS. The previous instructions (sudo apt install rpicam-apps) are thus not applicable anymore
sudo apt install libcamera-apps
Installs a suite of command-line tools to capture photos and video.
sudo apt install python3-picamera2
Installs Python bindings for the camera, so we can control it from Python script
wget https://www.uugear.com/repo/WittyPi4/install.sh
sudo sh install.sh
This is needed for later power management
Step 4: Activate mobile hotspot
When using your Raspberry Pi Zero in the field — where no local Wi-Fi is available — you can configure it to act as a Wi-Fi hotspot. This allows your laptop or phone to connect directly to the Pi, without needing any external network - this is also useful when only a closed network is available.
Once you’re back in a lab or home setting, you can switch the Pi back to a regular Wi-Fi network.
Below are the full steps to enable hotspot mode, connect via SSH, make it persistent, and later switch back to a normal Wi-Fi connection.
Enable NetworkManager
First, make sure that NetworkManager is installed, enabled, and running. This tool manages wireless connections (including hotspots) and replaces older tools like wpa_supplicant and dhcpcd.
Run:
sudo systemctl enable NetworkManager
sudo systemctl start NetworkManager
Enable configures the service to start automatically on boot (i.e., every time the system is turned on), start activates the service right away.
You can verify your wireless device (usually wlan0) is available:
sudo nmcli device
Option A: Create a hotspot (quick method)
To create a hotspot, use the following command:
sudo nmcli dev wifi hotspot ifname wlan0 ssid HOSTNAME password YOURPW
Replace HOSTNAME with the name you want the hotspot to show, replace YOURPW with a secure password (the one given in Ilias). nmcli stands for network manager command line interface, dev wifi hotspot tells nmcli to create a hotspot, ifname wlan0 specifies the network interface name to use for broadcasting the hotspot. On most Raspberry Pi models, wlan0 refers to the onboard Wi-Fi.
Once the command runs successfully, your Pi will start broadcasting a Wi-Fi network. You can now connect your laptop or phone to that network.
Connect to hotspot
After joining the hotspot from your laptop, connect to the Raspberry Pi by opening a terminal and typing:
ssh USERNAME@10.42.0.1
Replace Username with the username defined before. You should now be asked to type in a password.
Option B: Make a permanent hotspot to connect automatically if no wifi is available
If you created a test hotspot before, better check the current names:
nmcli connection show
To rename the hotspot, use this code:
sudo nmcli connection modify "Hotspot" connection.id fallback-hotspot
Create a permanent hotspot profile.
Change the Stationname and your PW (must be without squared brackets). If an error occurs, check (s. above) whether your hotspot is actually named “fallback-hotspot”.
sudo nmcli connection add type wifi ifname wlan0 con-name fallback-hotspot autoconnect no ssid [YourStationName]
sudo nmcli connection modify fallback-hotspot 802-11-wireless.mode ap 802-11-wireless.band bg ipv4.method shared
sudo nmcli connection modify fallback-hotspot wifi-sec.key-mgmt wpa-psk wifi-sec.psk "[yourPW]"
Create a script which starts a hotspot of no WiFi is available
Open a new script called “wifi-fallback”
sudo nano /usr/local/bin/wifi-fallback.sh
A blank .sh should open. Now, paste this:
#!/bin/bash
sleep 30  # wait for network to settle
# Check if Wi-Fi is connected
CONNECTED=$(nmcli -t -f DEVICE,STATE dev | grep wlan0 | grep -q ':connected' && echo yes || echo no)
if [ "$CONNECTED" = "yes" ]; then
  echo "Wi-Fi is connected. Ensuring hotspot is down."
  nmcli con down fallback-hotspot 2>/dev/null
else
  echo "No Wi-Fi. Starting hotspot."
  nmcli con up fallback-hotspot
fi
Write it out with ctrl+O and close it with ctrl+X
Make it executable:
sudo chmod +x /usr/local/bin/wifi-fallback.sh
Create a systemd service:
sudo nano /etc/systemd/system/wifi-fallback.service
Paste:
[Unit]
Description=Fallback Wi-Fi Hotspot
After=network.target NetworkManager.service
Requires=NetworkManager.service

[Service]
ExecStart=/usr/local/bin/wifi-fallback.sh
Type=oneshot

[Install]
WantedBy=multi-user.target
Again, write it out with ctr+o and close with ctr+X
enable it:
sudo systemctl daemon-reload
sudo systemctl enable wifi-fallback.service
DONE!